If Google can’t see your main content in the raw HTML, you have a JavaScript SEO risk. I’d check 5 things first using top SEO tools: raw HTML vs. rendered HTML, crawlable links, canonicals and robots tags, blocked resources and hydration issues, and sitemap-to-index gaps in Google Search Console.
Here’s the short version:
- Raw HTML first: I want to see the title, canonical, robots tag, H1, main copy, key links, and JSON-LD in the server response.
- Rendered HTML second: If JavaScript changes or adds key SEO signals later, indexing can slip.
- Links must be plain links: If core navigation depends on click handlers instead of
<a href>, crawlers may miss pages. - Canonicals and robots must match: If they differ before and after rendering, Google can pick the wrong URL or drop the page.
- Resources must stay open: Blocked JS, CSS, or API files can leave Google with a blank shell.
- Sitemaps must match index goals: If more than 20% of submitted URLs are not indexed, I’d treat that as a site-wide warning sign.
This checklist is about one simple test: can a crawler find, read, and index the page without waiting on client-side code?
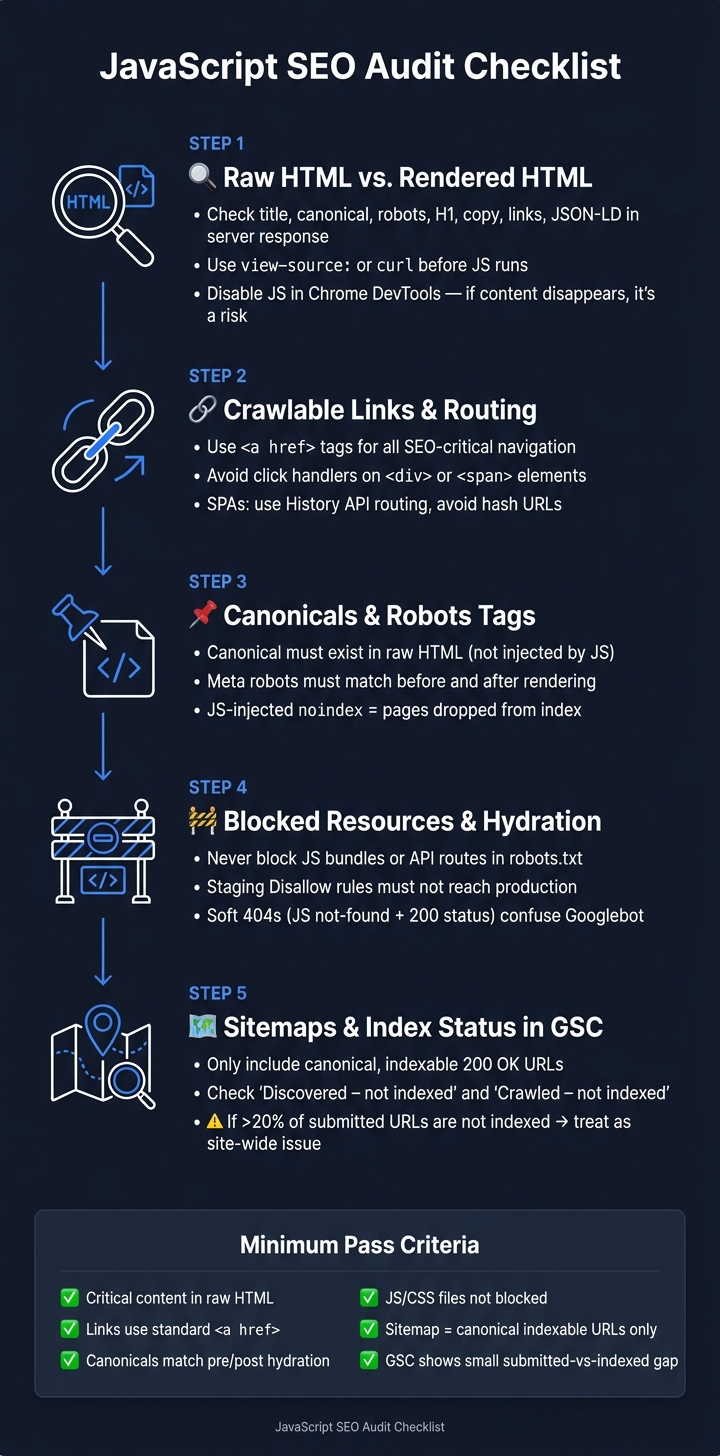
JavaScript SEO Audit: 5-Step Checklist for Crawlable Pages
1. Check raw HTML against rendered HTML
Start with the server response. Look at what the page sends before JavaScript runs.
Test the raw HTML first. Use view-source: or curl to confirm that <title>, meta description, canonical, robots, H1, primary copy, navigation links, and JSON-LD are all in the server response. Then compare that output with the rendered DOM.
Here’s a fast gut-check: turn off JavaScript in Chrome DevTools and reload the page. If something disappears, it may create crawl or index gaps. Watch for browser-only meta tags from React Helmet. Also check for images that hide the LCP candidate behind data-src.
Compare the rendered DOM by template
Run two crawls in Screaming Frog - one with JS rendering on and one off. Then compare what changes after rendering: additions, removals, and rewrites. Do this by template, not by individual URL.
| SEO Signal | Raw HTML | Rendered DOM | Flag |
|---|---|---|---|
| Title / Meta | Must be present | Can change after rendering | Missing in raw |
| Canonical | Must be present, absolute | Must match raw version | Any mismatch |
| Robots Tag | Must not contain noindex |
Must match raw version | JS-injected noindex |
| Main Content / H1 | Must contain primary text | Fully hydrated | Empty or thin raw body |
| Internal Links | Must use <a href> tags |
May be JS-injected | Links absent in raw |
| Structured Data | Recommended in raw (JSON-LD) | Often JS-injected | Move to raw for visibility |
Use Search Console URL Inspection to compare raw HTML and the rendered DOM at the template level. Pay close attention to canonicals. If a canonical appears only after rendering, Google may canonicalize the wrong URL.
Then check whether links, canonicals, and metadata resolve the same way in both raw and rendered HTML.
sbb-itb-5be333f
2. Audit links, canonicals, and metadata
After you compare raw HTML with the rendered version, the next step is to check how crawlers get to the page.
Check crawlable internal links and routing
Use standard <a href> links for any navigation that matters for SEO. If navigation depends on click handlers on div or span elements, crawlers may miss it.
For SPAs, use History API routing, avoid hash URLs, and make sure infinite scroll also exposes paginated URLs.
It also helps to compare crawl-found URLs against your XML sitemap. If a sitemap URL has no internal links pointing to it, treat it as an orphan.
Then check that canonicals, robots tags, titles, and headings stay the same after rendering.
Validate canonicals, robots, titles, and headings
Make sure canonical tags exist in the raw HTML and match the rendered DOM. A canonical added only on the client side isn't crawlable.
Use Google Search Console's URL Inspection tool to compare the crawled page with the rendered page for each template type. Check that the canonical URL, meta robots tag, title, and H1 are the same in both versions and aren't changed by client-side code.
| URL Template | Canonical (Raw) | Meta Robots | Title Tag | H1 | Internal Link Pattern |
|---|---|---|---|---|---|
| Product Page | Absolute URL | index, follow | Unique product name | Product name | <a href="/p/id"> |
| Category Page | Absolute URL | index, follow | Category + brand | Category name | <a href="/c/slug"> |
| Blog Post | Absolute URL | index, follow | Post title | Post title | <a href="/blog/slug"> |
| Search Results | Self-referencing | noindex, follow | Query term | Results for [Query] | <a href="/p/id"> |
If you're using Next.js, use generateMetadata so metadata is server-rendered by default.
After that, test robots rules, blocked resources, and hydration behavior.
3. Review robots rules, blocked resources, and hydration issues
Next, make sure crawlers can fetch the scripts, API responses, and assets that the page needs to render.
Test robots.txt, blocked resources, and status codes
A common mistake is blocking API routes or JavaScript bundles in robots.txt. In Next.js and Nuxt apps, those URLs often carry the data that fills in the page. When they’re blocked, Googlebot may only see a partly rendered page.
It’s also worth checking for staging rules that slipped into production. One stray Disallow: / in a live robots.txt file can shut down crawl coverage.
For missing pages, return a real 404 or 410. Don’t serve a JavaScript-made not-found page with a 200 status code.
Check content visible before interaction
Turn off JavaScript in Chrome and reload your main templates. If body copy, navigation, headings, or structured data vanish, that content depends on client-side rendering. Google may process it later, and crawlers without JavaScript support won’t see it at all.
Look at content that shows up only after user actions too - tabs, accordions, and infinite scroll are common trouble spots. Without a crawlable paginated or static fallback, that content can be missed in Google’s first HTML pass.
Hydration can also replace server-rendered head elements after the page loads. Check each template type against the table below.
| Template | Pre-render Content Visibility | Hydration Changes | Blocked Resources |
|---|---|---|---|
| Product Page | A loading state or empty shell | Injects description, reviews, and price | /api/ endpoints in robots.txt |
| Category Hub | Static header/footer only | Populates product grid and filters | Third-party filter scripts |
| Blog/Article | Headline only | Injects body text and related posts | CDN-hosted assets |
| Navigation | Empty <nav> or mobile menu |
Hydrates links and mega-menu | Asset directories (/wp-content/) |
Use these checks to compare what belongs in your XML sitemaps with what Google has actually indexed.
4. Validate sitemaps and index status
Check XML sitemaps and canonical alignment
Treat your sitemap as the final control list for URLs Google should index. It should be a clean list of canonical, indexable URLs - including JS routes that are supposed to rank.
Only include canonical URLs that return 200 OK and are meant to index. Leave out redirected URLs (3xx), noindexed URLs, and duplicates. For JS routes, make sure the <link rel="canonical"> tag and any meta robots directives appear in the raw HTML. They shouldn't show up only after hydration.
Use Search Console to confirm indexing and rendering
Compare your sitemap with Search Console to find URLs that were submitted but not indexed. Start with Discovered - currently not indexed and Crawled - currently not indexed.
If the gap between submitted and indexed URLs is above 20%, treat it as a system-level problem. Use URL Inspection to compare the submitted URL, the selected canonical, and the rendered output. Then check the screenshot tab to confirm render quality. If the screenshot is blank or stuck on a loading state, that's a sign of a rendering failure.
Use this matrix to spot sitemap, canonical, and index mismatches by template.
| URL / Template | Sitemap Status | Index Status | Canonical | Robots |
|---|---|---|---|---|
| Product Detail | Submitted | Indexed | Self-referencing | Allow |
| Category Page | Submitted | Discovered - currently not indexed | Matches rendered | Allow |
| Filtered View | Not submitted | Excluded | Points to category | Noindex |
| JS-Driven Route | Submitted | Crawled - currently not indexed | Matches raw HTML | Allow |
If GSC picks a different canonical, check the raw HTML canonicals again and review duplicate URL signals.
Conclusion: Minimum pass criteria for a JavaScript SEO audit
A JavaScript SEO audit comes down to one plain question: Can crawlers find, read, and index key content without depending on JavaScript? Use the five checks above to judge whether a template is safe to crawl.
Minimum pass criteria: critical content and metadata appear in raw HTML, internal links use standard <a href> elements, canonical tags and robots directives stay the same before and after hydration, required JavaScript and CSS files are not blocked, the XML sitemap includes only canonical indexable URLs that return 200 status codes, and Search Console shows only a small gap between submitted and indexed URLs.
If a core template fails any of those checks, the problem is structural - not cosmetic.
If these checks pass across your core templates, the site is technically fit for search crawling and indexing.
FAQs
How do I check raw HTML vs. rendered HTML?
Use three checks:
- View Page Source to see the raw server response.
- Disable JavaScript in Chrome DevTools, then reload the page.
- In Google Search Console, use URL Inspection and Test Live URL to view the rendered HTML.
If key content or links show up only after rendering, the page relies on client-side JavaScript. Comparing the source with the rendered output shows what Googlebot gets from the server versus what the browser runs.
Why can JavaScript break internal linking?
JavaScript can break internal linking by hiding links from Googlebot during its first crawl. Googlebot reads the raw HTML first and renders JavaScript later. So if your links only appear after JavaScript runs, Googlebot may miss them on that first discovery pass.
Another common issue is navigation that relies on JavaScript click handlers instead of standard <a> tags. In that setup, crawlers may have a harder time recognizing those links as links at all.
What does a high sitemap-to-index gap mean?
A high sitemap-to-index gap usually means crawlability or indexation trouble. Your XML sitemap lists many more URLs than Google has put into its index.
You can spot this in Google Search Console by filtering the Page Indexing report by sitemap.
A gap above 20% usually points to a technical issue. On JavaScript-heavy sites, common causes include rendering delays that leave content unindexed for weeks. In some cases, search engines also put more attention on higher-authority pages because crawl resources are limited.