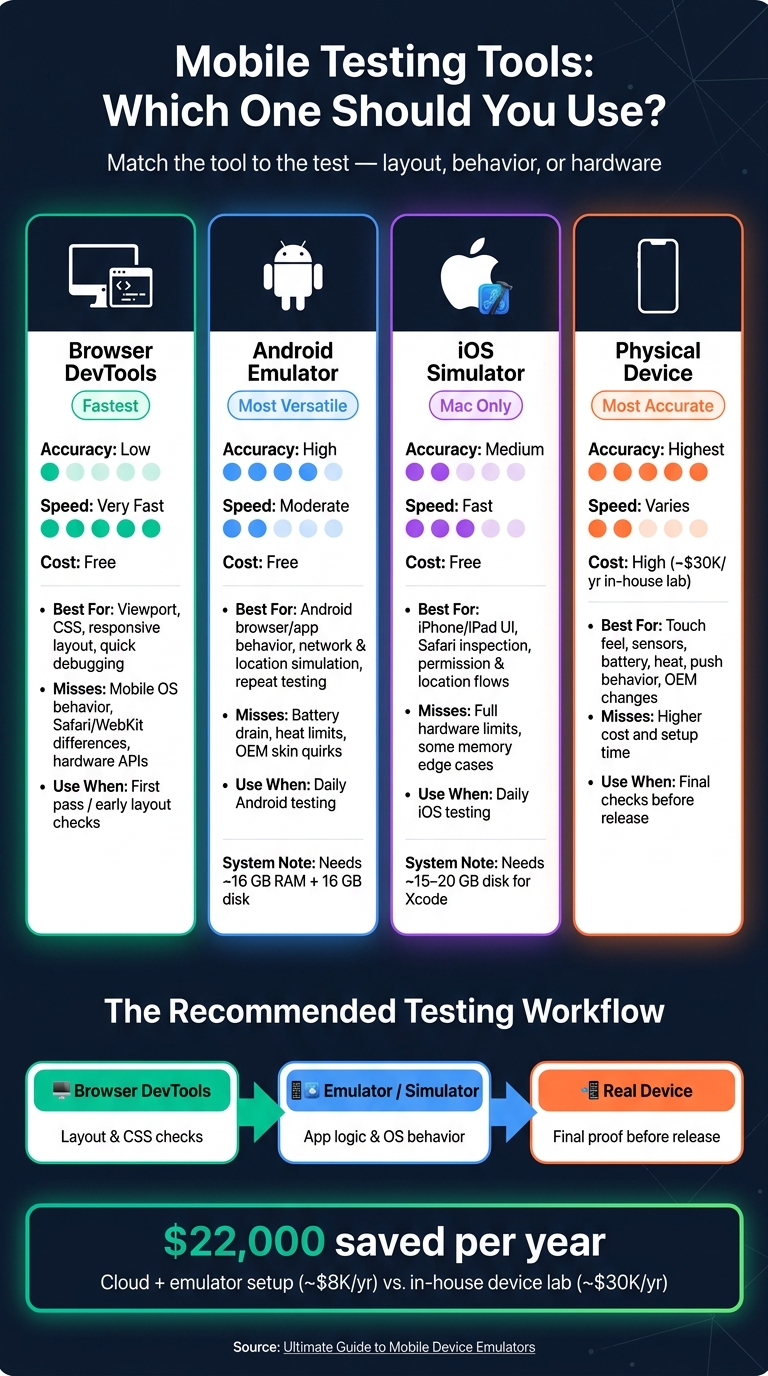
If I need one simple answer, it’s this: I use browser device mode for fast layout checks, Android and iOS virtual tools for app and browser behavior, and physical phones for final proof. With mobile-first indexing shaping how Google judges pages, that stack helps me catch issues tied to layout, speed, touch input, permissions, and mobile rendering before they hurt traffic or sales.
Here’s the short version:
- Browser device mode is best for screen size, CSS, and responsive checks
- Android Emulator is best for Android behavior, app logic, and repeat tests
- iOS Simulator is best for Safari and iPhone UI checks on a Mac
- Physical devices are still needed for camera, NFC, Face ID, battery, heat, and OEM skin issues
- A solid workflow is: DevTools first → emulator/simulator next → real phone last
A few points stood out to me from the article:
- Google uses the mobile version of a page for indexing
- Android Studio usually needs about 16 GB RAM and 16 GB free storage
- Xcode plus simulator runtimes can take about 15–20 GB of disk space
- An in-house device lab can cost around $30,000 per year, while a cloud-plus-emulator setup may drop that to about $8,000 per year
- Common test targets include LCP, INP, CLS, tap targets, viewport setup, and JS behavior
Mobile Emulator Tools Compared: Speed, Accuracy & Cost
Mobile testing on emulators & simulators: types, differences, usage
sbb-itb-5be333f
Quick Comparison
| Tool | What I can check | What it misses | Best time to use it |
|---|---|---|---|
| Browser DevTools | Viewport, CSS, responsive layout, quick debugging | Mobile OS behavior, Safari/WebKit differences, hardware APIs | First pass |
| Android Emulator | Android browser/app behavior, network and location simulation, repeat testing | Battery drain, heat limits, OEM skin quirks | Daily Android testing |
| iOS Simulator | iPhone/iPad UI, Safari inspection, permission and location flows | Full hardware limits, some memory edge cases | Daily iOS testing |
| Physical Device | Touch feel, sensors, battery, heat, push behavior, OEM changes | Higher cost and setup time | Final checks before release |
So if I’m picking the right tool fast, I ask one question: Am I checking layout, software behavior, or phone hardware? That one filter usually tells me where to start.
Types of Mobile Emulators and When to Use Each One
Pick the tool based on what you need to check: layout, app logic, or device-specific behavior.
Android Emulator, iOS Simulator, Browser Tools, and Physical Devices Compared
Every option comes with a tradeoff between speed and how closely it matches a real phone. Android emulators are closer to actual Android hardware and software, but they tend to run slower than browser tools. The iOS Simulator in Xcode runs code natively on your Mac, so it feels faster, but it doesn't match real device limits as closely.
Browser DevTools work best for fast viewport and layout checks. They're not the right tool for checking device behavior. Physical devices give you the closest match to real use, especially when OEM skins change how apps behave.
| Tool | Accuracy | Speed | Cost | Best Use Case |
|---|---|---|---|---|
| Browser DevTools | Low | Very fast | Free | Quick CSS and responsive layout checks |
| iOS Simulator | Medium | Fast | Free | Rapid iOS UI and logic development |
| Android Emulator | High | Moderate | Free | Functional testing and Android app development |
| Physical Device | Highest | Varies by device age/spec | High | Performance, sensors, and battery testing |
A simple way to think about it: use emulators for day-to-day checks, then use physical devices before you ship. That matters because each tool has blind spots.
Common Limits That Affect Test Results
Even a good emulator can't mirror hardware behavior in full.
Memory: The iOS Simulator uses your Mac's RAM pool, so it may not hit the same memory ceiling as a real iPhone. In plain English, memory warnings that could crash a phone might never show up in simulator testing.
Performance and sensors: Your laptop usually has more processing headroom than a phone. On top of that, emulators don't model thermal throttling or battery drain. So performance tests often look better in an emulator than they do on actual hardware. Sensors are also simulated. GPS, for example, uses synthetic coordinates instead of messy real-world signal changes. Features like Face ID, ARKit, NFC, and Bluetooth are best checked on physical devices because virtual setups can't fully reproduce them.
OEM-specific behavior: Push notifications also need testing on real devices. OEM battery optimization rules, like the ones in Xiaomi HyperOS, can limit background app behavior in ways emulators don't show. If your app depends on timely push delivery, test it on a physical device running the target OEM skin.
With those limits in mind, the next step is picking the right emulator and setting it up the right way.
How to Set Up and Use Popular Mobile Emulators
Start with Android Studio Emulator, iOS Simulator, or browser DevTools device mode. Use the lightest tool that can reproduce the issue. Then move up only when mobile OS behavior starts to matter. That approach helps you check mobile rendering, interaction problems, and crawl-critical UI behavior before they hurt search visibility.
Android Studio Emulator and Android Virtual Devices
Android Studio bundles the emulator directly, so there's no separate download needed. Plan for at least 16 GB RAM and 16 GB of free disk space. On modern Apple Silicon machines like the M3 Pro, a cold boot can take about 5–8 seconds on Apple Silicon.
To create a virtual device, open Device Manager from the Android Studio Welcome screen through More Actions > Virtual Device Manager or from View > Tool Windows > Device Manager. Click Create Device, pick a hardware profile such as Pixel 8, and choose a profile with the Google Play logo if you need the Play Store and the official Chrome for Android app. Then select a system image at your target API level, such as Android 15 or Android 16, and check the RAM, storage, and startup orientation settings before you click Finish.
Once the emulator is running, use the toolbar to rotate the screen and take screenshots for layout review. Open Extended Controls to simulate network conditions like LTE or Edge. For location testing, go to More (...) > Location and enter coordinates or load a GPX/KML file. If you're checking SEO rendering or caching behavior, right-click the AVD in Device Manager and select Wipe Data before each run so you start clean.
Tip: Windows users should note that Intel HAXM is deprecated. Use the Android Emulator Hypervisor Driver (AEHD) or Windows Hypervisor Platform (WHPX) instead for hardware acceleration.
Use the same AVD profile for repeat checks so layout and performance results stay consistent.
iOS Simulator in Xcode
The iOS Simulator is free, but it requires macOS and about 15–20 GB of free disk space for Xcode and its simulator runtimes. Open Simulator from Xcode's Dock menu: Open Developer Tool > Simulator.
You can switch models from the Simulator menu through Device > [model]. To inspect pages in simulated Safari, enable the Develop menu in macOS Safari's Advanced settings. Then go to Develop > [Simulator Name] to attach the inspector to the active tab. This helps when you're chasing Safari-specific CSS bugs and safe area issues that browser DevTools can't mirror with much accuracy. Use Shift + Command + V to paste URLs directly into the simulated Safari address bar, and test geolocation from Features > Location in the Simulator menu.
Browser DevTools Device Mode and Automation Basics
Browser DevTools device mode is the fastest starting point for layout checks and CSS media query validation. It's free, instant, and needs no installation. The downside is simple: it uses a desktop browser engine, not the actual mobile browser stack, so it won't catch rendering differences tied to real mobile Chrome or Safari.
If the layout looks fine but behavior still feels off - geolocation logic, Add to Home Screen prompts, or Safari-specific rendering - move to the iOS Simulator or Android Emulator. For automated checks, the Android Emulator supports headless mode through the -no-window flag for CI/CD pipelines, and iOS Simulator can be scripted with xcrun simctl. Tools like Appium 2.x, Maestro, and Playwright can drive both for repeatable validation. Use automation to recheck rendering, scripts, and viewport behavior after each release.
If the issue depends on mobile OS behavior, switch from device mode to a native emulator.
| Feature | Browser DevTools | Android Emulator (AVD) | iOS Simulator (Xcode) |
|---|---|---|---|
| CI/CD Support | Excellent (Playwright/Puppeteer) | Excellent (CLI/Headless) | Good (xcrun simctl) |
| Headless Mode | Native | -no-window flag |
xcrun simctl |
| Automation Tools | Playwright, Puppeteer | Appium 2.x, Maestro | Appium 2.x, Maestro |
Practical Use Cases for SEO, Performance, and Debugging
After setup, emulators are a fast way to check layout, speed, and device behavior under mobile limits.
Responsive Layout and Mobile-Friendly Validation
Google's mobile-first indexing makes the mobile version the main version for evaluation. That means mobile layout bugs can affect search visibility directly.
A simple starting point is to use top SEO tools to cycle through device profiles that line up with your traffic:
| Device | Viewport (CSS px) | Device Pixel Ratio (DPR) |
|---|---|---|
| iPhone 15 Pro | 393 x 659 | 3 |
| iPhone 14 Pro Max | 430 x 739 | 3 |
| Pixel 8 | 412 x 839 | 2.625 |
| Galaxy S24 | 393 x 852 | 3 |
| iPad Pro 11 | 834 x 1194 | 2 |
For each main template - home page, category page, product page, lead form, and blog post - make sure text is easy to read without zooming and tap targets are easy to hit. Then switch to landscape and see if the layout still holds up. This is where odd spacing, broken navigation, and clipped buttons tend to show up.
Give overlays extra attention too. On mobile, a pop-up that seems minor on desktop can eat up most of the screen and get in the way fast.
If the layout looks good, move on to load and interaction checks.
Performance, JavaScript Rendering, and Device-Specific Behavior
Layout checks only show part of the picture. A page can look fine and still hurt conversions or rankings if it loads slowly or acts differently under mobile conditions.
Use 3G or 4G throttling in tools like Playwright or through Chrome DevTools Protocol (CDP). That helps surface Largest Contentful Paint (LCP) delays and Cumulative Layout Shift (CLS) problems that may stay hidden on fast office Wi-Fi. Single-page apps are worth extra attention here. Route changes that feel instant on desktop can drag badly on slower mobile networks.
Mobile JavaScript behavior is another spot where emulators help a lot. Touch event handlers like touchstart and touchend do not behave the same way as mouse events, and interactive elements can break or respond oddly when triggered through touch input.
If performance seems steady, the next step is location and permission testing.
Geolocation, Permissions, and a Realistic Test Strategy
If your site shows location-based content - like local landing pages or store locators - mocking GPS coordinates in the emulator is a quick way to test those experiences before launch.
Permission flows need the same level of care. Step through prompts for location access, push notifications, and camera use on both Android and iOS profiles. A broken permission dialog or a missing fallback state can quietly cut into conversions on pages that rely on those features.
Emulators work best as a first filter, not the last word. Use them early and often for layout, function checks, and rendering validation. OEM skins like One UI can introduce battery optimization and background process behavior that stock Android emulators do not model perfectly.
So the practical workflow is simple: start with emulators, then confirm on one modern iPhone, one flagship Android, and one mid-range Android device before release.
Benefits, Limitations, and Final Recommendations
Where Emulators Save Time and Money
Now that the setup is out of the way, the next step is simple: figure out where emulators earn their keep.
The biggest win is speed. Emulators boot fast and reset cleanly, which makes them a strong default for early development and CI/CD pipelines. They cover most early-stage and automated checks without much friction. That speed also helps teams validate mobile layouts, scripts, and crawl-critical issues before those problems hurt search visibility or usability.
Cost matters just as much. Running an in-house device lab can cost about $30,000 per year to maintain, while a cloud-based and emulator mix can cut that to roughly $8,000 per year. That’s a big gap.
Emulators also help with bug reproduction. If a bug shows up once and then disappears, you can reset an emulator to a clean snapshot and try again under the same conditions. Doing that on a physical device is often far less consistent.
Where Emulators Fall Short and How to Compensate
This is where the tradeoff shows up. The same speed that makes emulators useful also creates blind spots.
Because emulators run on powerful PC hardware, they don’t mirror thermal throttling, battery drain, or slower flash storage. So if a page feels fine in an emulator, that doesn’t always mean it will feel fine on an older phone in someone’s hand.
Touch behavior is another weak spot. A mouse click is precise. Human thumbs are not. Real users deal with imprecise taps, multi-touch gestures, and pressure sensitivity, and emulators don’t handle those differences well.
For WebKit-specific rendering, use an iOS Simulator or a real iPhone. Standard emulators usually run stock Android, so they can miss manufacturer-specific behavior from skins such as Samsung One UI or Xiaomi MIUI.
| Area | Emulator/Simulator | Real Device |
|---|---|---|
| Layout testing | ✅ Reliable across screen sizes | ✅ Confirms real rendering |
| Performance checks | ⚠️ No thermal throttling or battery drain | ✅ Real-world performance profiling |
| Device API testing | ⚠️ Simulated sensors with no real sensor variation | ✅ Accurate hardware behavior |
| Accessibility/UI behavior | ⚠️ Misses assistive-tech timing and real-user interaction differences | ✅ Better reflects real screen reader timing and behavior |
Conclusion: Build a Mobile Testing Stack That Fits the Job
The practical move is to match the tool to the test.
Use emulators for unit tests and UI component tests. Then move performance validation and pre-release checks to real devices. To decide which devices matter most, pull data from Firebase or Google Analytics and look at your top 10 device models plus the devices with the highest crash rates.
A simple stack often works best:
- Browser tools for quick layout checks
- Emulators for repeatable validation across mobile layouts and scripts
- Real devices for final sign-off before release, especially a mid-range Android that reflects lower-end processor constraints
That approach keeps testing tied to the issues that hit usability, performance, and conversions the hardest.
FAQs
Which emulator should I start with?
It depends on what you need.
For Android app development, Android Studio Emulator (AVD) is the best place to start. It’s Google’s official emulator, and it lines up closely with how actual Android devices behave. That makes it a solid pick for testing apps without too many surprises.
For personal use or gaming, BlueStacks and LDPlayer are two of the most common picks. They’re built more for running apps and games smoothly on a desktop, so they tend to fit casual use better than developer-focused tools.
For iOS development, the official choice is Xcode 26 Simulator.
When do I need a real phone?
You need a real phone for final validation under actual use conditions. Emulators and simulators help early in the process with UI design, debugging, and basic function checks. But they can’t fully match hardware features, device-specific behavior, or live network conditions.
Use a real device to test hardware-dependent features, actual performance, and the overall user experience - especially before app store submission.
Can emulators replace device testing?
Not completely.
Emulators are great for fast, low-cost, early testing. They work well for unit tests, UI layout checks, and automated CI/CD workflows. If you want quick feedback without pulling out a stack of phones, they do the job.
But they don't fully match real devices. They can miss OEM-specific behavior, hardware sensor issues, and day-to-day performance factors like memory use and battery drain.
The best move is to use both.