If your XML sitemap includes noindex pages, redirects, blocked URLs, or broken pages, it needs cleanup. I use Screaming Frog to check 4 things fast: whether sitemap URLs match the crawl, which indexable pages are missing, which sitemap URLs should not be there, and whether the final export includes only canonical 200 OK pages.
Here’s the short version:
- Use Spider mode for a site-wide crawl and sitemap comparison
- Use List mode to test sitemap URLs only
- Run Crawl Analysis after the crawl, or the sitemap filters will stay empty
- Check for:
- URLs in Sitemap
- URLs Not in Sitemap
- Orphan URLs
- Non-Indexable URLs in Sitemap
- Canonical mismatches
- Keep only live, canonical, indexable URLs
- Split files if you go past 50,000 URLs or 50 MB uncompressed
A clean sitemap gives search engines a shorter, clearer list of pages to process. That means fewer mixed signals and less waste.
I’d treat this as a simple workflow: crawl, compare, cut bad URLs, and export a clean file.
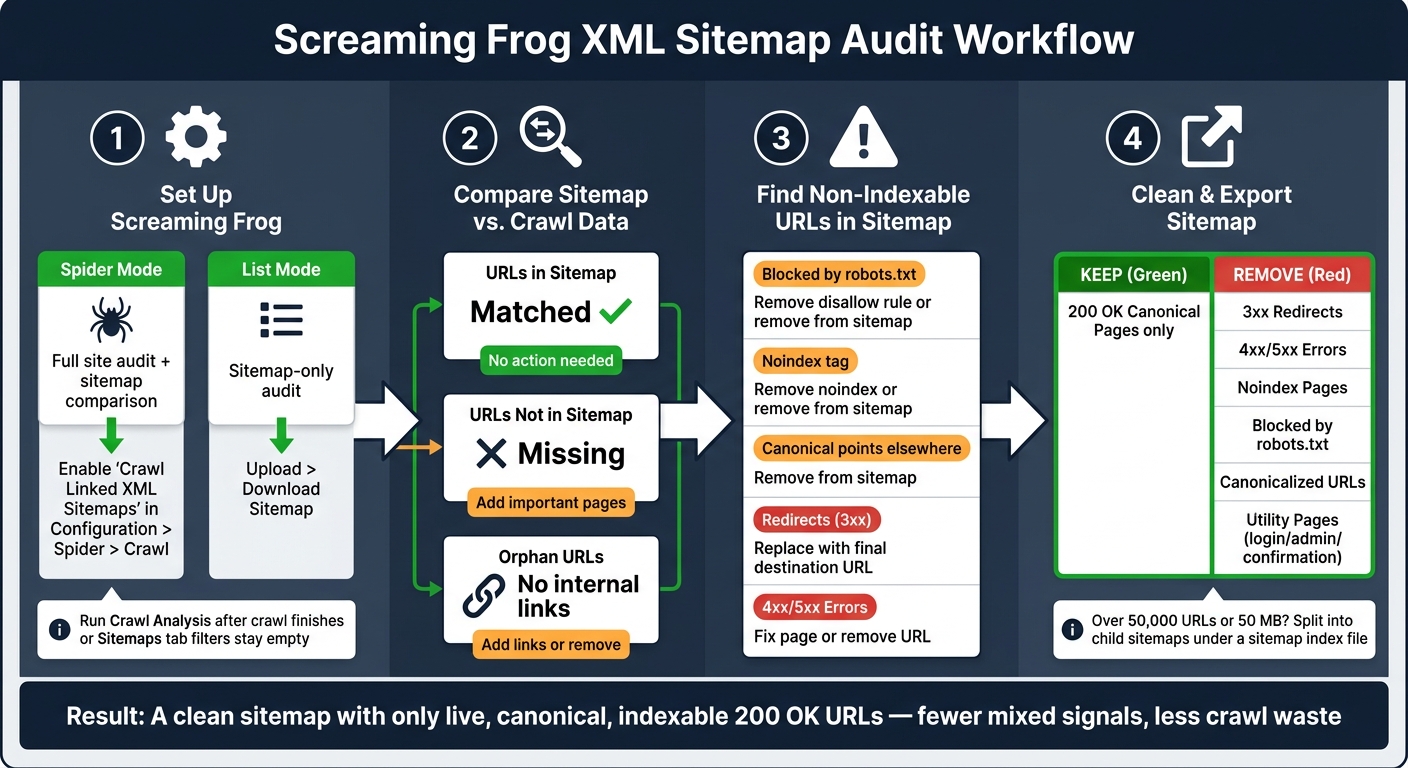
Screaming Frog XML Sitemap Audit Workflow
How to Audit an XML Sitemap with Screaming Frog
sbb-itb-5be333f
1. Set up Screaming Frog to crawl XML sitemaps
Use Spider mode for a full-site audit. Use List mode when you only want to check a sitemap.
Enable sitemap crawling in Spider mode
By default, Screaming Frog does not crawl XML sitemaps in Spider mode. To turn this on, go to Configuration > Spider > Crawl and check Crawl Linked XML Sitemaps.
After that, you have two ways to add sitemaps:
- Auto Discover XML Sitemaps via robots.txt
- Crawl These Sitemaps to add sitemap URLs by hand
Use the manual option if the sitemap URLs are not listed in robots.txt.
Use List mode to crawl a sitemap file directly
If you want a sitemap-only audit, switch to Mode > List. Then go to Upload > Download Sitemap and enter the sitemap URL.
Screaming Frog will crawl only the URLs in that sitemap. It won't follow the rest of the site.
One catch: List mode does not surface orphan URLs.
| Spider Mode | List Mode | |
|---|---|---|
| Best for | Full site audit + sitemap comparison | Auditing specific sitemap URLs only |
| URL discovery | Follows internal links and linked XML sitemaps | Sitemap file only |
| Orphan URL detection | Yes | No |
| Speed | Slower (full crawl) | Faster (targeted) |
Run Crawl Analysis after the crawl finishes
When the crawl is done, run Crawl Analysis > Start to populate the filters in the Sitemaps tab.
"Once the crawl has finished, a 'Crawl Analysis' will need to be performed to populate the Sitemap filters." - Screaming Frog
If you skip this step, the sitemap comparison views won't fill in. That includes orphan URLs and non-indexable URLs found in the sitemap. Next, compare sitemap URLs against crawl data in the Sitemaps tab.
2. Crawl the site and compare sitemap URLs with crawl data
Once Crawl Analysis is done, head to the Sitemaps tab and compare sitemap URLs against your crawl data. This is where you split pages into clear groups: matched URLs, missing URLs, and orphan pages.
Review the Sitemaps tab and core sitemap filters
Start with URLs in Sitemap and URLs Not in Sitemap.
URLs in Sitemap shows pages found in both the crawl and the sitemap. These are your matched URLs.
URLs Not in Sitemap shows indexable pages found during the crawl that are missing from the sitemap. If those pages matter, add them to the sitemap.
Check for orphan or missing URLs from Crawl Analysis
Orphan URLs are listed in the sitemap but weren't reached through internal links during the crawl. That usually means one of two things: the page needs internal links, or it probably shouldn't be in the sitemap in the first place.
For pages that matter, add internal links. For low-value URLs, remove them from the sitemap.
Sitemap-vs-crawl filter reference table
| Filter | What It Means | Next Action |
|---|---|---|
| URLs in Sitemap | Found in both the crawl and the sitemap | No action needed. |
| URLs Not in Sitemap | Indexable pages found in the crawl but absent from the sitemap | Add important pages to the sitemap |
| Orphan URLs | In the sitemap but not reached via internal links during the crawl | Add internal links or remove if low-value |
| Non-Indexable URLs in Sitemap | Sitemap URLs that are blocked by robots.txt, noindexed, or non-canonical | Remove these from the sitemap |
| Canonical Mismatch | Sitemap URLs with a canonical tag pointing to a different URL | Replace with the canonical URL |
Next, remove non-indexable URLs from the sitemap.
3. Find non-indexable URLs inside the sitemap
Use the Non-Indexable URLs In Sitemap filter in the Sitemaps tab to pull out the URLs flagged in the crawl comparison. A sitemap should list only canonical, indexable 200 URLs. That means redirects, noindexed pages, and blocked URLs shouldn't be there.
Use the Non-Indexable URLs In Sitemap filter
After Crawl Analysis finishes, open the Sitemaps tab and choose Non-Indexable URLs In Sitemap from the filter dropdown. This view shows sitemap URLs that are blocked by robots.txt, marked noindex, canonicalized to another URL, or returning 3xx, 4xx, or 5xx status codes.
The filter flags five issue types:
| Issue Type | Why It's Flagged | Recommended Action |
|---|---|---|
| Blocked by robots.txt | Search engines are told not to crawl the URL. | Remove the disallow rule if the page matters for search. |
| Noindex tag | A meta tag or HTTP header tells engines not to index it. | Remove the noindex tag from pages meant to appear in search. |
| Canonical points elsewhere | The page points to a different preferred version. | Remove it from the sitemap and keep only the canonical URL. |
| Redirects | The URL is not the final destination. | Swap it out for the final destination URL. |
| 4xx/5xx Error | The page is broken or the server failed. | Fix the page or remove the dead URL from the sitemap. |
Export issue lists for review and handoff
Once you've isolated the problem URLs, export the list so someone can clean it up. You can export the filtered URLs as a CSV or Excel file for developers or SEO leads. If you want the full report, go to Bulk Export > Sitemaps > Non-Indexable URLs in Sitemap.
If Google Search Console was connected before the crawl ran, sort the export by impressions. That's the fastest way to work through pages that get the most visibility first. For broken URLs, check the Inlinks tab to see where those pages are linked internally, then update those links. Use the export to cut bad URLs from the sitemap before you submit it.
4. Clean the sitemap list before submission
Once you’ve exported the issue list, the next step is simple: cut the bad URLs and rebuild the sitemap.
Decide what to keep and what to remove
Keep only live, canonical 200 URLs. Remove everything else.
That includes broken URLs, redirects, canonicalized pages, and any page that sends mixed signals. You should also strip out utility pages like login, admin, and confirmation pages. Those pages don’t belong in a sitemap, and they won’t help you rank.
Use Screaming Frog XML sitemap export filters
Screaming Frog makes this part pretty direct.
After the crawl finishes, go to Sitemaps > XML Sitemap. In the XML Sitemap settings, uncheck Noindex Pages, Canonicalized URLs, and any paginated URLs you don’t want included. Then make sure the export is limited to 200 OK URLs only.
If your site has more than 50,000 URLs or the file goes over 50 MB uncompressed, Screaming Frog can split the output into multiple child sitemaps under one sitemap index file. That keeps everything within sitemap limits without doing the split by hand.
Keep-vs-remove reference table and workflow summary
| URL Type | Action | Reason |
|---|---|---|
| 200 OK Canonical Pages | Keep | These are the main pages you want search engines to find and rank. |
| 3xx Redirects | Remove | A sitemap should link straight to the final URL, not a redirect path. |
| 4xx/5xx Errors | Remove | Broken pages waste crawl budget and hint at poor site upkeep. |
| Noindex Pages | Remove | Adding a page to the sitemap while telling bots not to index it sends a mixed message. |
| Blocked by Robots.txt | Remove | Search engines can’t crawl these pages, so they shouldn’t be listed. |
| Canonicalized URLs | Remove | Only the preferred version should appear in the sitemap. |
| Utility Pages | Remove | Login, admin, and confirmation pages don’t add search value. |
The workflow is straightforward: crawl the site, run Crawl Analysis, filter out non-indexable URLs, export the issue list, and then export a clean XML sitemap.
FAQs
When should I use Spider mode instead of List mode?
Use Spider mode when you want to crawl an entire website by following internal links from the homepage. It’s the default option for broader audits, where you want the crawler to find the site structure on its own.
Use List mode when you only need to crawl a set of specific URLs, such as pages from an XML sitemap or another predefined source.
Why is Crawl Analysis required after the crawl?
Crawl Analysis is required because it fills in and checks the sitemap filters against what the crawler actually found.
That matters for a simple reason: a sitemap can say one thing, while the site itself says another. Crawl Analysis lets you compare sitemap URLs with crawl data and catch mismatches before you resubmit.
It helps you spot issues like:
- Non-200 status codes
- Canonicalization problems
- noindex conflicts
- robots.txt blocks
- Orphaned URLs
- Non-indexable entries
Once you see those gaps, you can clean up the sitemap and resubmit a list that reflects pages search engines can access and index.
How often should I audit my XML sitemap?
Audit your XML sitemap at least quarterly so it stays accurate and doesn’t waste crawl budget. If you publish more than 20 pages per month, move to a monthly audit schedule.
You should also audit right after major site changes, like a CMS migration, redesign, URL restructure, or a large content update. And if you’re in the middle of SEO fixes, weekly crawls can help you check that those changes are working and spot new issues early.