If your AMP pages fail validation, the fix is usually simple: find the issue in Google Search Console, test one live URL in an AMP validator, fix the shared template or plugin causing it, then request revalidation.
In most cases, one template bug can break dozens or even hundreds of pages at once. So I’d start with shared layouts, image components, CSS output, script injections, canonical tags, and schema markup—often using top SEO marketing tools - not random page-by-page edits. AMP errors are not the same as mobile usability or Core Web Vitals issues, so I’d check the AMP report first and keep the diagnosis narrow.
Here’s the short version:
- Use Search Console first to see the issue type and affected URLs
- Validate one live page with
#development=1in Chrome DevTools or the AMP Validator - Trace the error to its source - usually a template, CMS field, or plugin
- Fix the root cause once so it applies across all matching pages
- Test on staging and production
- Click
Validate fixone time in Search Console and monitor the status
A few patterns show up again and again:
- Missing AMP boilerplate or bad
<head>markup <img>used instead of<amp-img>- Custom JavaScript or third-party scripts injected by themes or plugins
- CSS that breaks AMP rules or goes over the 75 KB limit
- Canonical or
rel="amphtml"wiring problems - Structured data image issues that hurt rich result eligibility
My takeaway: treat AMP errors like a template and QA problem, not a content cleanup project. That approach cuts wasted work and makes the fix path much clearer.
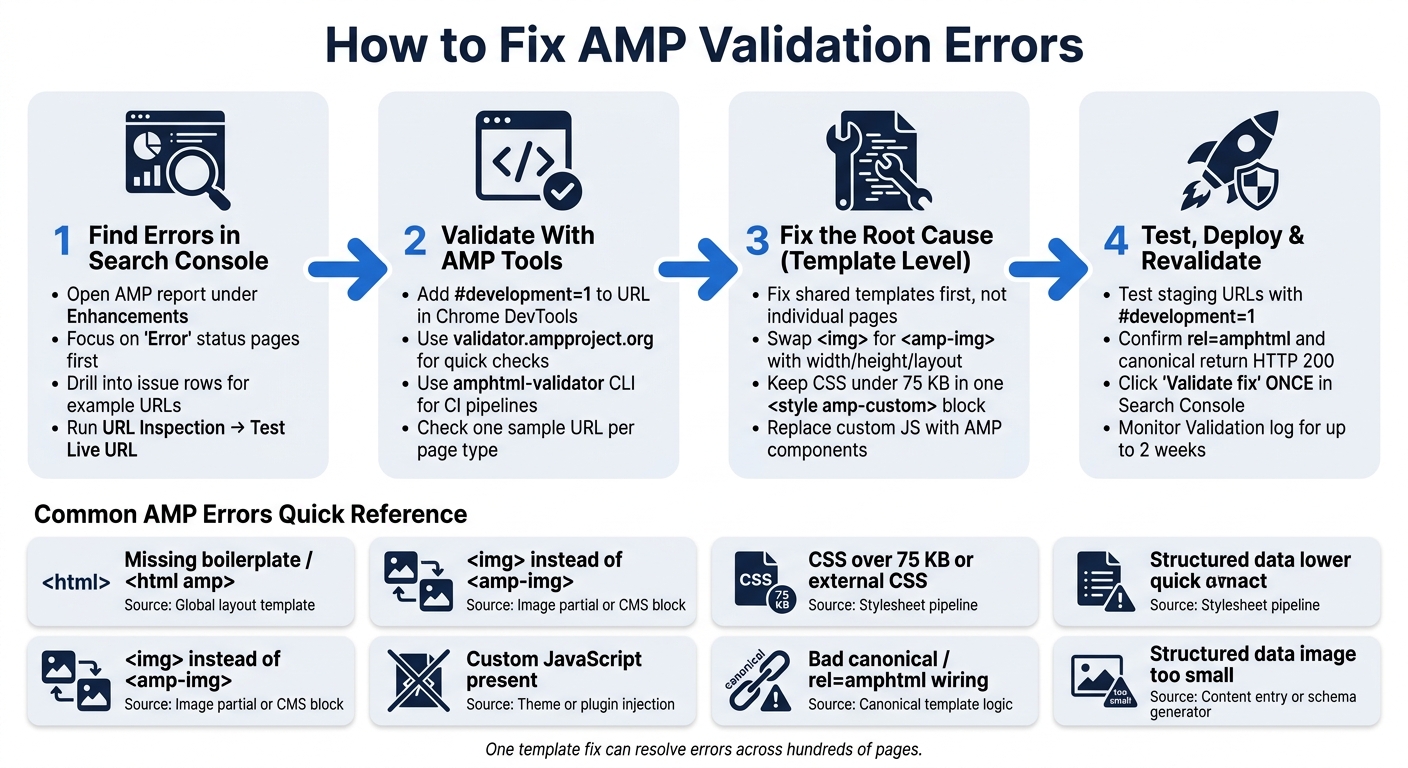
How to Fix AMP Validation Errors: 4-Step Process
Step 1: Find and Prioritize AMP Errors in Google Search Console
Open the AMP Report and Read Issue Counts Correctly
Start in Search Console and look for the AMP failures that matter most first. This is the fastest way to tell whether you're dealing with a sitewide template bug or just a handful of broken pages. Sign in, choose the correct property, and open the AMP report under Enhancements in the left-hand menu. If you don't see the report, Google hasn't found AMP pages for that property yet. In that case, check that the URLs are live and crawlable.
Pay attention to the status groups:
- Error: the page is not eligible for AMP
- Valid with warnings: the page can still appear as AMP, but something is off
- Valid: Google found no AMP issues
Start with Error pages. Then check the trend chart to see whether the problem just appeared or keeps coming back. A sharp jump often lines up with a release, plugin update, or template change.
Drill Into Example URLs Using Issue Details and URL Inspection
Click any issue row to open the detail page. You'll see a short summary of the issue, a trend chart for that specific problem, and a table with example URLs. Look through several examples, not just one. That makes it much easier to spot whether the problem ties back to a single page type.
Before you send the issue to a developer or dig into code, inspect one of those URLs with URL Inspection and run Test live URL. That checks the live page, not Google's saved copy. It's a simple step, but it can save time because it tells you whether the page still fails right now. If the live test says the page is valid, the fix may already be out, and you can move on to requesting validation.
Fix Template-Level Issues Before Page-Level Issues
Fix shared templates first. One edit can remove errors across a large set of URLs. Use the example URL patterns to find the shared source before you spend time on one-off pages.
Here's the simple way to think about it: if the example URLs follow the same path pattern - like /blog/ or /products/ - or they belong to the same page type, you're probably looking at a shared template issue. If the affected URLs are all over the place, the problem is more likely tied to page-level content, such as an unsupported embed or markup added to a single post. If the URLs match a pattern, fix the template or CMS rule. If they don't, fix the markup on the individual page. After that, move to validator checks for the affected template.
sbb-itb-5be333f
Understanding validation errors with AMP WordPress plugin
Step 2: Validate Pages With AMP Tools and Browser Debugging
Once you've found the affected template, reproduce the issue on a live or staging URL. After Search Console shows the affected URLs, run one of the AMP validators so you can see the exact rule that failed and where it came from.
Choose the Right Validator for Live Pages, Staging, or CI
Pick the top SEO tools that fit the place you're checking.
| Tool | Primary Use Case | Best Environment |
|---|---|---|
Chrome DevTools + #development=1 |
Debug a single URL and view exact line-level errors. | Local, staging, production when needed |
| validator.ampproject.org | Check one page or pasted HTML fast. | Local HTML paste, staging, or public URLs |
| amphtml-validator CLI | Run bulk validation in CI before deploy. | Local builds, CI pipelines |
| Chrome AMP Validator Extension | Validate pages as you browse. | Production and staging while browsing |
For engineering teams, amphtml-validator CLI fits well into build scripts and pre-deploy checks.
Use Chrome DevTools to Trace Exact Error Lines
If you want the fastest path to the code causing the problem, use Chrome DevTools on one sample URL.
Add #development=1 to the end of the URL, reload the page, and open Chrome DevTools → Console. That fragment stays on the client side, so it's safe to use on production URLs.
In the console, you'll either see AMP validation successful or a list of errors with codes, messages, and line and column numbers. Click the blue file link next to an error to jump straight to the bad markup in the Sources panel. Then work backward to the template, CMS field, or component partial that produced it. Blocking errors need to be fixed. Warnings can wait if you need to triage.
You don't need to validate every single page. Check one sample URL for each page type.
Step 3: Fix Common AMP Errors in Templates, Components, and CMS Output
Use the validator output to fix the shared source, not just the broken URL. That’s the big idea here. One template fix can remove the same error across a large batch of pages. Start at the template level, then check components and CMS output.
Fix Missing Tags, Invalid HTML, and AMP Component Markup
Start with the base layout. Every AMP page needs <html amp lang="en"> or <html ⚡ lang="en">, <meta charset="utf-8"> as the first child inside <head>, a valid viewport tag, AMP boilerplate, and a canonical link. If even one of those items is missing - or placed in the wrong order - every page using that template can fail validation. Fix it once in the base layout, and the change flows across the site.
For the canonical URL, generate it server-side with a CMS token or a $canonicalUrl helper.
Next, swap <img> for <amp-img> and include width, height, and layout, such as layout="responsive". For example:
<amp-img src="/images/photo.jpg" width="800" height="600" layout="responsive" alt="Product photo"></amp-img>
Put that logic in your shared image component or partial. Then every image that comes through your content system outputs valid AMP markup by default.
Resolve CSS, JavaScript, Canonical, and Rich Result Issues
AMP allows one <style amp-custom> block under 75 KB. Remove external stylesheets, inline style attributes, and custom JavaScript. If your build pipeline merges several CSS files, combine them into one minified block and strip unused selectors so the final output stays under the cap.
Custom JavaScript won’t pass AMP validation. Use AMP components instead:
<amp-accordion>for collapsible sections<amp-carousel>for sliders<amp-bind>for simple state changes
If a third-party plugin injects scripts, turn it off or swap it out. Trying to patch around injected script output usually wastes time.
For JSON-LD images, use files that are at least 1,200 px wide and standard ratios like 16:9, 4:3, or 1:1. If your CMS lets editors publish undersized images, add a rule that blocks publishing until the image meets the requirement.
Run both the AMP Validator and the Rich Results Test on the same URL. That way, you can catch AMP markup problems and structured data issues in one pass.
Map Each Issue Type to Its Source
Use this map to trace each error back to the file, template, or field that caused it.
| Issue Type | Likely Source | Best Detection Tool | Impact |
|---|---|---|---|
Missing <html amp>, boilerplate, or <meta charset> |
Global AMP layout template | AMP Validator, Search Console AMP report | Page is entirely invalid AMP |
<img> instead of <amp-img> |
Image partial or CMS content block | AMP Validator, DevTools console | Validation failure, images don't render |
| Custom JavaScript present | Theme, plugin, or injected script | AMP Validator, source inspection | Full AMP invalidation |
| External CSS or CSS over 75 KB | Base template or stylesheet pipeline | AMP Validator | AMP invalid or styling blocked |
Bad canonical or rel="amphtml" wiring |
Canonical template logic | Search Console, Screaming Frog, source inspection | Discovery and indexing issues |
| Structured data image dimension errors | Content entry or schema generator | Rich Results Test | Rich results eligibility lost |
If an error appears only on certain URLs - not across the whole site - compare the rendered HTML on those pages with a clean template. That side-by-side check usually points to the source: a content field with pasted embed code, a plugin turned on for only some post types, or a one-off template override.
Step 4: Test Changes, Roll Out Safely, and Revalidate in Search Console
After you fix the shared template, check the release on staging before you revalidate in Search Console.
Test Key Templates and High-Traffic URLs Before Release
Start with your highest-traffic AMP URLs on staging. Open each staging URL with #development=1, then check the DevTools console for errors. After that, confirm the page passes in the AMP Validator at validator.ampproject.org.
Also review the <head>. Make sure rel=amphtml and canonical links are present, and confirm both return HTTP 200. This should be part of your pre-deployment checklist.
When staging looks clean, push the fix to production and begin Search Console revalidation.
Request Validate Fix and Monitor Recrawl Progress
After the production release is live, spot-check the affected URLs, then click Validate fix once.
That part matters: click Validate fix once. Sending the request again and again can slow things down.
Revalidation can take up to two weeks. While that happens, watch the Validation log on the issue details page. It shows each URL as Pending, Passed, Failed, or Other. If validation fails, use See details to find the URL that caused the failure, fix it, and start the process again. Try not to ship unrelated template changes during an active validation cycle. If you bundle changes together, it gets much harder to tell what broke.
Conclusion: A Simple Workflow for Keeping AMP Valid Over Time
The process is pretty simple and repeatable: find errors in Search Console, confirm them with the AMP Validator and Chrome DevTools, fix the template-level root cause, test on staging, push to production, then click Validate fix and watch the results. Add amphtml-validator to CI so new errors get caught before they ship.
AMP troubleshooting works best when you treat it like a routine, not a one-off cleanup. The teams that keep AMP valid over time are usually the ones that run the same checks after every release.
FAQs
Why do AMP errors often affect many pages at once?
AMP errors often hit a lot of pages at the same time. Why? Most sites use templates to publish content at scale. So if one shared template has a mistake, that same mistake shows up on every page built from it.
That’s how problems like a wrong canonical tag, a broken hreflang setup, or bad schema markup can spread across product pages or category pages. And once that happens, you can end up with validation errors across many URLs in one shot.
Should I fix template issues before editing individual pages?
Yes - fix template issues first before editing individual pages. Template-level AMP problems, like generated canonical tags, metadata, or markup errors, can cause the same validation or indexing issue across many URLs.
Then use Google Search Console’s URL Inspection and Test Live URL to check the page’s current state. After that, use Validate Fix or request recrawling before a broader rollout.
How long does Search Console AMP revalidation usually take?
After you apply fixes and use Validate Fix in Google Search Console, AMP revalidation usually takes up to two weeks. For larger sites, it can take longer.
Before you troubleshoot, check the Last Crawl date in the report so you know you’re working with the latest information.